Monday, December 5, 2011

Winterberry (Ilex verticillata) A Favorite Native Landscape Plant

Although this winterberry (Ilex verticillata) has only a few
berries remaining, the winterberry is widely used in
wreaths and decorative holiday arrangements for its
winter color.
Photo by Brad Sylvester. Copyright 2011. Do not copy.
Driving along the back roads of New Hampshire in the fall after the leaves have dropped, it is not unusual to see the otherwise bare branches of the winterberry (Ilex verticillata) bedecked with bright red berries. In fact, you'll often see cars stopped near these wild, native shrubs clipping off the branches with the festively colored berries to weave them into homemade wreathes or to simply arrange them in vase as a holiday decoration. Winterberries are actually a species of holly plants as are all members of the Ilex genus.

I did not think that there was any winterberry growing on my property, but while taking a walk through the woods yesterday, I noticed a few dozen red berries on a thin tree-like plant that stood about 6 feet high. Winterberry! As you can see from some of the pictures on this page, it was growing in what I might call a vernal pool, if it were spring. Since it is December, however, I'll call it a wet, low-lying area flooded by recent rains and snow-melt located in the forest about twenty feet away from the edge of a stream bed.

Two small winterberry shoots can be seen to the right of
the larger main stem emerging from runner roots that
travel underground.
Photo by Brad Sylvester. Copyright 2011. Do not copy.
As you can also see from the picture on the right, the forest floor there is covered in this year's fallen leaves and pine needles. The decay of leaves and evergreen needles tends to make soil acidic, which is actually preferred by the winterberry. It also prefers very moist soil such as that found along roadside ditches, river banks, lake shores, and wet, low-lying areas in the middle of the forest.

Winterberry is shade tolerant and will grow in areas of only partial sun, such as the middle of a forest where I found this one. It will grow, much fuller and bear more fruit if it is placed in full sun since it will be able to harvest more energy from the sun which it uses to grow, flower, and fruit.

Actually, though, not all winterberry plants fruit. The plant has both male and female sexes and it is only the female plants that will produce the bright red berries. In order to do that, however, they need to be pollinated by a male winterberry plant. If you have one on your property that does not flower, then it is either a male plant, or a female plant without any male winterberry plants nearby.

Aside from the berries, which grow off the sides of young branches as shown in the pictures, the bark is a useful identification marker in the winter as well. The trunk and branches have horizontal lenticels, much like a birch tree, that break up the smooth bark. A lenticel, as we are reminded by this Cornell University publication,  is an area that allows the  plant's inner bark to "breathe," by providing permeable openings in the bark of the winterberry, which would otherwise not allow gas exchange.

In the spring, the winterberry has tiny, yellow-green flowers, which will become green berries on the female plant if pollinated. The green berries ripen around late October, turning a vibrant red. The red berries will stay on the branches through most or all of the winter, providing eye-candy for humans and a more nutritious treat for many wild animals. The USDA says as many as 48 species of birds eat the fruit of the winterberry plant as do white-tailed deer, moose, snowshoe rabbits and cottontail rabbits, as long as the latter two can reach the berries, often aided in their reach by walking atop deep snow. Winterberry plants can reach as high as 8-15 feet in height.

Propagating Winterberries

Winterberries, like many wild plants, have redundant systems of reproduction. They have fruits that contain seeds, of course, but they also send out runners, roots that travel underground and surface periodically with a new plant, like lilacs and many other shrubs. With human intervention, cuttings can be taken and rooted to make new plants as well.

Seed Propagation of the Winterberry Plant

Winterberry fruit (Ilex verticillata) and two seeds
Photo by Brad Sylvester, copyright 2011. Do not copy.
Of the three methods only the seeds produce new plants which contain a mix of the genetic material between the pollinating male plant and the fruit-producing female plant. Each berry contains 3-5 seeds each with a hard outer shell. That shell protects the seed as it travels through the digestive system of birds or other animals that eat the berries. The bright red fruit that is easy for birds to find helps ensure that the seeds are widely dispersed. Presumably, if the bird that found the berries prefers the same habitat in which it found the winterberry plant, then it will deposit the seeds, or most of them, in the plant's favored habitat although that may be far away from the parent plants.

Winterberry seeds do need to be cold-conditioned before they will germinate effectively. That means either leaving them outside and collecting them in the spring to be planted, or collecting them in the fall and winter from the ripe red berries and placing them in the refrigerator (not the freezer) for a period of 45 days or more before planting them as you would any other seed. Plants grown from seed may turn out to be either male or female plants, there's no way for the average gardener to choose, or even tell which it is until the plant is several years old and becomes sexually mature.
Winterberry Propagation by Runner Shoots and Cuttings

The runner shoots can be dug up after the leaves have dropped off the winterberry plant and it has gone dormant for the winter. The third method of propagating winterberries is to root cuttings. This is done in the spring (May-June) when the plant is primed and in growth mode. Using either of these propagation methods will result in new plants that are exact genetic copies of the plant from which they were taken. That means they will even be the same sex so plan accordingly and remember that you'll need at least one male, pollinating plant near the female plants if you want them to produce berries.

I'll write up and link some complete guides to various types of propagation, as well as handling and transplanting tips and link from each appropriate plant on this blog soon. --Follow this blog now with either Networked Blogs or Google Friend Connect (found in the margins of this page) if you don't want to miss it.--

In the spring, I'll definitely take some cuttings from this winterberry plant and add a few new plants to the more landscaped part of my yard along the stream bed in the back yard. Because winterberry is a native plant to the area and will be planted in the type of soil and conditions that it prefers. It is an eco-friendly choice for New Hampshire home-owners, requiring neither extra watering nor special pesticides or fertilizers to thrive here.

Saturday, October 8, 2011

Propagating Perennials from Seed: Cold-conditioning

Many of the pereennials we choose to keep in our yards are selected for their beautiful flowers. Whether we're adding a spash of color to a border area of our yard or building a complex web of colors in our gardens, perennials offer just what we need. Once we have one that we really like, we often want to add more of the same variety. There are several ways to propagate perennials, for this blog entry, I'm going to talk about seed propagation.

Flowers exist to make seeds. That's what they're for as far as the plant is concerned. Bright colors or attractive scents are just tools to make the flowers better at producing seeds. Color and scent attract pollinating insects or birds to fertilize the flowers by transferring pollen from the anther to the stigma of either a different flwoer or within a single flower.

Once a flwoer is pollinated in this way, the pretty petals are no longer useful to the plant so the plant stops using up energy to maintain them. The dry up and fall away leaving behind the grwoing seeds. Seeds may either be encased in some sort of pod, as in the California poppy or may grow individually as they do in the cone flower. In any case, once the flower dies off, the plant diverts energy to the growth of the seeds themselves.

Gardeners who want the plant to continue flowering for a longer period of time can make the decision of where to send energy for the plant. By cutting off the flowers as they begin to fade and wither, a process called dead-heading, the gardener can stop the plant from expendign it resources on seed growth. Instead, many plants, detecting the lack of viable seeds, will rush to produce more flowers to start the seed-producing process all over again before autumn sets in.

Those who want to gather seeds from their perennials to produce even more plants next year, therefore, should not dead-head the spent flowers. Even though more flowers might grow later, the plant should have more energy earlier in the year and the first batch of flowers and seeds should mature faster and be more prolific and hardy.

When the seeds look all dried up they are ready to harvest. For those growing in pods like the iris or poppy, the top of the pod may "pop," providing a way for the seeds to exit the pod. Collect the seeds and carefully label them if you are going to save them until spring planting or start them indoors.

Seeds collected from many perennial plants adapted for northern climates will not grow if planted indoors immediately or if kept indoors until spring. Think about it. If these seeds were ready to sprout as soon as they matured, most would start growing in the autumn after a late summer rain or during a warm week in late Spetember or October. This would mean the plants would be fragile and tiny seedlings when the frost and killing freeze hit them.

The would not have strong root systems or stores of energy saved up from rampant leafy growth phase that often occurs in the parent plant after the seeds have matured. In other words, they would not have the stregnth or energy to survive the winter and spring up again whne the ground thaws and the warm weather returns the following year.

Plants have adapted to the climate over millions of years and have solved this problem in a variety of ways. One of the most common ways that seed-producing plants in northern climates have overcome this obstacle is to produce seeds that will not sprout until they have been cold-conditioned, or spent some time in winter-like temperatures. Extended periods of cold are required to "prime" the seeds or trigger them to respond to favorable growing conditions.

Failure to cold-condition seeds harvested from garden plants is one of the main reasons for very low yields or complete lack of germination. Fortunately, armed with a little knowledge, gardeners can cold-condition perennial seeds to make them ready to plant.

This can be done in two ways. First, seeds can be cold conditioned the natural way. You can scatter or plant them in the fall before winter to allow them to be cold-conditioned by the winter termperatures. This will generally work fairly well. After all, if left to its own resources, it's how the plant would handle the matter itself. On the other hand, look at the number of seeds most plants produce and ask youself why your yard isn't completely overrun with wild flowers. Each poppy flower produces hundreds upon hundreds of seeds, but you don't wake up one spring morning to find five or ten thousand new poppy plants growing in your yard. That's because many of the seeds don't survive until spring.

Why not? Well, many reasons. Insects, birds, or rodents may eat them in the fall, the spring or even during the winter itself when other food is scarce for winter birds or those few rodents that don't hibernate. They may succumb to fungal infections or rot if they stay too wet for too long. They may be lying on top of the ground exposed to extrememly cold temperatures that test them beyond their cold-resistant properties. Perhpas they simply fall on a patch of ground that is not conducive to plant growth. Some few may even try to sprout without cold-conditioning, dooming them to an early demise.

Still, enough survive to ensure the continuation of the species, so leaving them to endure the winter can be a successful propagation strategy. The up side of this approach is that the seeds decide when to start growing in the spring. When the soil is warm enough, has the right level of moisture, and there is enough sunlight in the day to ensure the young seedlings have the best chance at survival, they will sprout on their own and begin to grow. This way, they are automatically hardened off to outdoor conditions.

To cold-condition perennial seeds this way, harvest the dried seeds from the plants in the fall or as soon as they are ready. Decide where you want them to grow next year. Clear other plants that may already be growing there so the new sprouts will have less competition form stronger more mature plants. This may means digging or pulling up roots as many wild perennials will propagate from even small pieces of root.

It doesn't have to be a perfect process, but the more of the existing plants that are pulled, the better chance the need seeds will have in the following spring. Then, after the first few frost, simply scatter the new seeds over the prepared plot. Do not water them in. Remember, the plan is for them to remain dormant until spring. All that water will do at this point is reduce the viability of the seeds.

The other method of cold-conditioning perennial seeds is to keep them in the refrigerator for at least 45 days. The refrigerator temperature is cold enough to convince the seeds they have made it through an actual winter. However, the danger of this method is dehydrating the seeds. The cold air of the refrigerator will suck every bit of mositure out of the seeds, killing them in the process. 

To prevent this, pack them as you would pack food to prevent freezer burn. You can place them in a double-sealed freezer bag or an air-tight tupperware type container. You don't want too much moisture in the container or too much air. Once they have served their sentence in the fridge, the seeds can either be planted outdoors, or started indoors before it's warm enough to plant outdoors. Just remember that if you do start them indoors and want to transplant them outdoors, you'll need to harden them off, or gradually accustom them to the harsh rays fo the sun and the extreme hot and cold temperatures they may face once they are outside.

The second method, properly executed, should result in a much higher yield percentage for a given quantity of seeds. In other words, if 2-3 percent of the seeds survive and grow if left to fall from the parent plant and cold-condition in place, you might get as much as 80% or more germination from seeds harvested, cold-conditioned, and sprouted indoors.

Not all the perennial plants in your garden require cold-conditioning, but those well-adapted or native to northern climates likely will benefit.

Monday, September 12, 2011

One Plant, Two Names: Cilantro and Coriander

Cilantro leaf from the coriander plant
Photo by Brad Sylvester, Copyright 2011. Do not copy.
Coriander (Coriandrum sativum) is one of the plants that I've added to my yard. Specifically, I planted it in my herb garden. In New Hampshire it is an annual plant, although it can be self-seeding if the seeds are not all collected before they fall to the ground. In America, the leaves are usually referred to as cilantro while the ground seeds are known as coriander. For cooking, the leaves of the plant are used, usually fresh and green, and added at the end of cooking or used in cold dishes (like salsa). They can also be dried and crumbled for use over the winter, although the dried leaves have much less flavor. Some Thai food recipes that I like to cook also use fresh cilantro. For the most part, any recipe that uses red curry paste will benefit from a bit of fresh cilantro. Whatever the recipe, a little of this flavorful herb goes a long way.

Once the weather gets warmer, cilantro will produce little white flowers. If you pinch these off as soon as the buds form, you can prevent it from bolting for a little while longer, and increase the yield of coriander seeds that you'll get later. At some point, however, the flowers will come too fast to keep up with unless you are tending it every day. While that means the plant is getting ready to stop producing the broader leaves, it also means the plant will soon be producing another spice: coriander. Coriander is simply the ground seeds of the cilantro plant. As the flowers fade, they will, if they've been pollinated, produce a green ball of about 1/8 inch in diameter. This ball will dry and harden over the next couple of weeks. After hardening, it will drop off to reseed your cilantro for the next year. Each one contains two seeds.

Seeds of the coriander plant waiting to dry and harden
Photo by Brad Sylvester. Copyright 2011. Do not copy.

However, the plant produces many, many flowers and many, many seeds. If you collect the seed balls and then grind them up using a spice grinder like this one that I use, you'll have fresh coriander in addition to the cilantro you've stored from this one plant. You can grind up a batch for the winter after harvesting them, or for much stronger flavor, store them whole and just grind a few when you need them.

Coriander is an introduced species, both in my yard and in North America. It grows in southeast Asia (hence it's use in Thai dishes), as well as northern Africa and Southern Europe. I most often use coriander seeds mixed with a few other spices to make what I call a "Morroccan Spice" mixture that reminds me of the flavors of that region.

I originally bought this plant as a group of young seedling plants from a local nursery, but have saved the seeds and replanted it each year. I actually make sure to plant a few seeds around the herb garden each fall, letting them overwinter in the ground. This way, they come up as soon as the temperature and soil conditions are right. That way, I don't have to figure out when it's warm enough to put plants out or go through a hardening off period with plants that I started indoors. By letting the seeds overwinter in place, they do all the thinking for me.

Monday, August 15, 2011

A Discussion of Edible and Poisonous Mushrooms

One of the most memorable culinary experiences I’ve had was a wild mushroom soup prepared and served at the Mountain Top Inn in Vermont. My wife and I stayed there on one of our anniversaries many years ago. I don’t have the recipe or remember the chef’s name, but I do remember that the soup had a rich and unique flavor quite unlike ordinary mushroom soup. Unfortunately, I don’t even know what kinds of mushrooms were used in the soup.
The forests of New England are absolutely full of mushrooms of many, many varieties. Some are edible and some will kill you dead. Others fall somewhere in between those extremes.  It is not uncommon here to read about people dying of mushroom poisoning. Often it’s an entire family as someone picked the wrong kind of mushrooms and prepared a family dinner with them. Reading about these kinds of events as a child left me with a very healthy and persistent respect for wild mushrooms. If you’re not 100 percent sure what it is, don’t ever eat it.
Not ever having enough confidence to be 100% sure of a mushroom’s identity, I’ve never picked or prepared wild mushrooms for eating. As a result, I have a long-running streak of more than years without ever having fallen victim to any sort of mushroom poisoning, a streak I intend to continue.  The best way to be sure is to bring a qualified and experienced expert along with you to show you the ropes.
Don’t Listen to Me about Edible Mushrooms
Furthermore, I would never rely on any advice about what mushrooms will or will not kill me that I find on someone’s personal blog, no matter how authoritative they may sound. I’d strongly advise you to use that same caution, especially with regard to my blog. I am not a mushroom expert, I am not giving you enough detail to distinguish edible mushrooms from poisonous ones. Do not try this at home.
Building Mushroom Identification Skills
Having said all of that, I’ve always wanted to learn to identify edible mushrooms, but have never really sat down and tried to learn the skill. Now, however, I am in the process of trying to identify every species of plant, including fungi, lichens and other plant-like creatures (as well as every animal species) that grows or lives in my 5.25 acre yard in Southern New Hampshire. Much of my yard, over four acres by my estimate) is forested so there is a wide variety of plants, animals and mushrooms present.
Always Assume the Worst
If I am to identify all those things, I’ll certainly need to know how to identify mushrooms. That means learning all the important (and minor) characteristics of mushrooms that are used by experts to distinguish one from the other. I’ll need to know which ones have near look-alikes, which ones are easy to identify, and which ones are nearly impossible to be sure of without detailed microscopic or chemical analysis. Always err on the side of survival: if there is any possible alternative identification which is not a confirmed edible variety, assume the worst and don’t take chances.
If I can do all of those things, then I should be able to confidently identify some edible mushrooms. The first mushroom that I found and chose for identification turned out to be the Cleft-foot Amanita (Amanita brunnescens), a mushroom listed as “possibly poisonous,” but certainly related to and similar in appearance to many very poisonous varieties of mushroom. In identifying this mushrooms, I learned a few more of the key traits that I should look for, including how to take a spore print to help narrow it down.
Mushroom Propagation Experiment
I’ve also heard from talking to experienced wild mushroom gatherers this summer, that wild, edible mushrooms frequently do not recur in the same location from year to year, although they might show up again several years later in a spot where they were previously found.  This seems a bit curious, but I suspect that there are either spores or rhizomes present once the mushroom has grown there, but they simply need specific weather conditions to begin growing. Many mushrooms grow among deciduous leaf litter or pine needles, which gets me thinking.
“Seeding” New Mushrooms from a Paper Spore Print
If I take a spore print of a mushroom on a piece of plain paper which is made of much the same raw materials as leaf litter… Could I simply take that spore print to a suitable area of the forested part of my yard similar to where the original was found and place that spore-covered sheet of paper under a layer of leaf-litter and get more of the same mushrooms to grow the following year? I don’t know, but I certainly intend to try. After all, if you are “seeding” a specific variety of mushroom in a very specific location and what grows matches the ID marks for the target species, you can have a pretty darn good confidence in the species and edibility of the resulting mushroom, if any indeed result at all. Furthermore, you could cultivate larger quantities in this manner to ensure a good supply in future years.
Bear in mind, I’m not talking about introducing non-native varieties, but simply helping mushroom species that already grow wild in my yard to grow in more places in my yard, assuming, of course, that I find any edible varieties here to begin with.

Sunday, August 7, 2011

First Fungus - Cleft-foot Amanita (amanita brunnescens)

Cleft-foot Amanita in a mixed deciduous-
coniferous wood with many oak trees.
Photo by Brad Sylvester, copyright 2011
Do not copy.
I've always wanted to learn to identify mushrooms, particularly the edible ones, but have never gotten around to it. Hopefully, the effort of learning how to identify every species of plant (which does include fungi such as mushrooms) that lives in my yard will help get me there. I have about four acres of forest in my yard, which is home to a wide variety of mushrooms and other fungi, so if I can figure out all of the ones that grow here, I should have a good start of familiar species and I should know most of the key traits to look for in order to properly identify most species.

To start with, I photographed a mushroom in various states of growth as there were several of the same species present. I lifted one out of the ground to look at the base. I photographed the stalk and the underside of the cap. I noted the type of ground and vegetation around it. I thought I had all the bases covered. I was wrong.

For many species of mushrooms, it may be necessary to 1) bruise the mushroom stalk to see if the bruise discolors and if so what color it turns. 2) slice the gills and see if they exude a latex and, if they do, what color it is, and if it changes color after exposure to air. 3) take a spore print and see the color of the spores. A microscopic examination of the spores can also provide an identification key, although that would rarely, if ever, be needed.

In this case, however, I got lucky and believe I have a good identification using the National Audubon Society Field Guide to North American Mushrooms. The mushroom specimen pictured here appears to be the cleft-foot amanita (Amanita brunnescens). A species listed as "possibly poisonous," but closely related (and similar in appearance) to some very seriously poisonous Amanita mushrooms. How did I get to that conclusion? Let's go through the steps.

The vertical split is clearly visible in this specimen of
Cleft-foot Amanita.
Photo by Brad Sylvester, copyright 2011.
First, the general shape of the mushroom with the large, bulbous base, the cap shape, the scales on the top of the cap and the ring around the stalk strongly suggest an amanita according to the shape key in the Audubon Guide. In fact, the shape narrows it down to nine varieties of amanita. When I notice that one of these is called the cleft-foot amanita. I recall that I noticed a distinct  vertical split or cleft in the base (or foot) of each mushroom specimen that I examined. It even shows in some of the photos. Bingo. That's my prime candidate.

Then we run down the other field marks or identification keys for this species. Dark brown to whitish at the margin, check. Patches left over from the universal veil on the top of the cap, check. A collapsing pendant ring (looks like a skirt of skin-like tissue) around the mid or upper stalk, check. Large, bulbous base with an abrupt start from the stalk, check. Gills are free (meaning that the gills are not attached to the central stalk), check. The base has a distinct vertical cleft or split, check. Season: July- October, check. Grows on dry ground among deciduous trees, especially oak, check. Flesh is white, check. Bruises to reddish-brown, unknown (although there is some brownish discoloration where the stalk has been subject to normal wear). Spore print is white, unknown.

The gills and collapsed pendant ring of the cleft-foot amanita
Photo by Brad Sylvester, copyright 2011
Furthermore the field guide provides several color plates which match my photos very closely and lists potential look-alike varieties (some of which are fatally poisonous) which I ruled out one by one by going through their identification guides. I feel quite confident in this identification. The spore print would help me pin it down to the genus Amanita, but I'm very confident at the genus level.

The bulbous base of the Cleft-foot Amanita begins abruptly
Photo by Brad Sylvester, copyright 2011
The cleft-foot amanita while listed as "possibly poisonous" belongs to the same Family and genus as the infamous Death cap mushroom, the deadly Destroying Angel mushroom, the hallucination and coma inducing Panther (a very near look-alike, rarely found in the east) and Fly Agaric mushrooms. Therefore, of course, it should not be eaten under any circumstances.

Saturday, July 23, 2011

Blazing Stars (Liatris spicata) - Butterfly Favorites

Liatris spicata - also known as
Blazing Star, Gay Feather and Snakeroot
Photo by Brad Sylvester, copyright 2011
Of course, some plants are easier to identify because I put them in my yard. For these introduced or cultivated species, we'll concentrate more on gardening information than on species identification. We have a perennial garden along the walkway that leads to our front door. We keep a wide variety of flowering plants that provide color throughout the summer. They also provide nectar and pollen for butterflies and other insects.

One of our favorites is the Liatris spicata. Like many widespread native plants, Liatris spicata has several common names as different communities encountered it and called it different things. Common names for this plant include blazing star, gay feather and snakeroot.

  • To add Liatris Spicata to your yard click here to visit BloomingBulb.com


  • The plant displays bright purple flowers beginning in mid-July. Because Liatris spicata is a late season bloomer, it is a perfect accompaniment to the early flowering bulb flowers like daffodils and the short-lived lily flowers. The shape of the flower stalks also provides a good vertical accent for the garden growing over three feet tall. The Robert W. Freckmann Herbarium site says Liatris spicata grow over 6.5 feet tall, but mine have not made it over four feet high.

    Bear in mind, however, that there are several different cultivars or varieties of Liatris spicata and each may have different blooming characteristics. I also have a white variety in my yard and it tends to start blooming a few weeks later than the purple variety, for example.

    Liatris Spicata is a favorite of bumblebees, drone flies and butterflies as its compound flowers provide a rich source of nectar and plenty of room for all.

    Blazing Stars are a favorite of butterflies and other nectar feeders
    Photo by Brad Sylvester, copyright 2011, all rights reserved

    Growing Conditions

    Liatris spicata does best in full sun and seems to be quite heat-tolerant and drought resistant. It has been as cold as 10 degrees below zero Fahrenheit for several days in a row since we put them in and the blazing star bulbs seem to have no trouble surviving in the ground. We don't water our perennial garden as just about everything there does well even in heat waves without extra care. Mulch helps to keep the moisture in the ground, as well as providing a little extra protection against the coldest temperatures.

    The Advantage of Landscaping with Native Species

    Blazing stars are native to North America and don't seem, in my yard at least, to be much bothered by insect pests. Japanese beetles and other leaf-eaters tend to leave it alone, as do chipmunks and other animals that might eat the bulbs. Blooming Bulb says it grows well in planting zones 3-9. The USDA species site says the Liatris spicata grows wild in the Eastern United States and Canada from the Gulf Coast to northern Hudson Bay.

    The fact that it is a native species means two things. First, we don't have to worry about it spreading beyond our yard as an invasive species which could become a nuisance. Second, it is well adapted to the growing conditions throughout its range and shouldn't need extra watering, chemical fertilizers or insecticides in order to grow. If it can grow in the wild without any help, it can definitely grow in your yard as long as you take good care of the soil by adding organic material on a regular basis.

    Propagation of Liatris Spicata

    The Liatris spicata will slowly spread from the area in which it's planted if it finds the spot to its liking. The roots can be dug up and separated to make a separate cluster in other locations. A good rule of thumb for bulbs is to plant them three times deeper than the height of the bulb.

    I prefer to divide and plant winter hardy bulbs in the late fall after the leaves have begun to die back, but before the ground freezes. That can be quite late in the year for Liatris spicata. You can also dig them in the early spring, before they really start growing for the year. If they are dug in the fall and can't be immediately replanted, you can keep them in a cool, dark place packed in sawdust, sand or other loose material that will keep them from getting too moist (to prevent mold or rotting). In this way you can trade them with neighbors and friends.

    Liatris spicata Seed Propagation

    Of course, the Liatris spicata, as a flowering plant, will also produce seeds and may also spread by self-seeding. If you collect the seeds, I prefer planting in the very late fall. This lets the seeds overwinter just as if they had fallen from the plant naturally. Some seeds require a period of cold-conditioning to make them viable. This is a built-in protection for plants that grow in cold climates. Without it, they might start to grow during a warm spell in the fall and be killed off by frost and freezing temperatures before they have time to establish bulbs or enough size to survive the winter. I can't say for certain whether this characteristic is present in Liatris spicata. I suspect that it does. If you prefer you can store the seeds in the refrigerator (in a sealed container to protect them from over drying) until you are ready to plant in the spring. The refrigerator (not the freezer) temperature is generally sufficiently cool to trigger the cold conditioning for seeds that require it.

    Thursday, July 21, 2011

    Creeping Fragile Fern (Cystopteris protrusa) - ID Methods and Data Collection


    Creeeping Fragile Fern (cystopteris protrusa)
    Photo by Brad Sylvester, copyright 2011, all rights reserved
    The plant species for today turned out to be the creeping fragile fern (Cystopteris protrusa), but it was a long two-day journey for me to figure it out. By the way, it’s also called Lowland Brittle Fern, Southern Bladder Fern, and Lowland Bladderfern. For me, identifying the species of the plants that grow in my yard is going to be much more difficult than identifying the animals that live in my yard as I do on my other blog: What Lives in my Yard. I could start off with very easy things like some of the big trees, the garden vegetables (whose names I can read from the seed packets), or some of the perennial flowers, but I want to develop some skills here and find reliable reference sources while I’m conducting this extended bio-survey. So today, I’m kicking it off with a fern, and detailing the process I went through to try to figure out what it was. A good field guide would have helped.
    To start with, I chose a wild plant growing in my yard, one that I believe to be native to the region. It is an attractive forest edge border plant. I definitely want to keep it growing where it is and may even think about establishing it in additional areas.
    Ordinarily, I’m going to include just one or two photos of each species that I record, because my storage space is limited. However, the first entry is going to be picture heavy, because I’m going to show a wide variety of traits that I captured in hopes of having enough information from which to draw a conclusion about this ferns’ true identity.

    Gathering Data about Plants in the Field
    Ferns along the forest edge
    Photo by Brad Sylvester, copyright 2011, all rights reserved
    First, where does it grow? As you can see from the picture to the right, it grows along the forest edge, but looking around my yard, I see that it only grows on the shady side. In other words, the woods are to the south of the ferns and the open yard to the north. That means the ferns are never exposed to bright, direct sunlight. As you can see above in a photo taken at about 1:30 pm on July 20, even at midday, the ferns are in shade or, at most, dappled sunlight. These ones happen to be near the edge of a seasonal brook, but I don’t know whether that is coincidental or not.
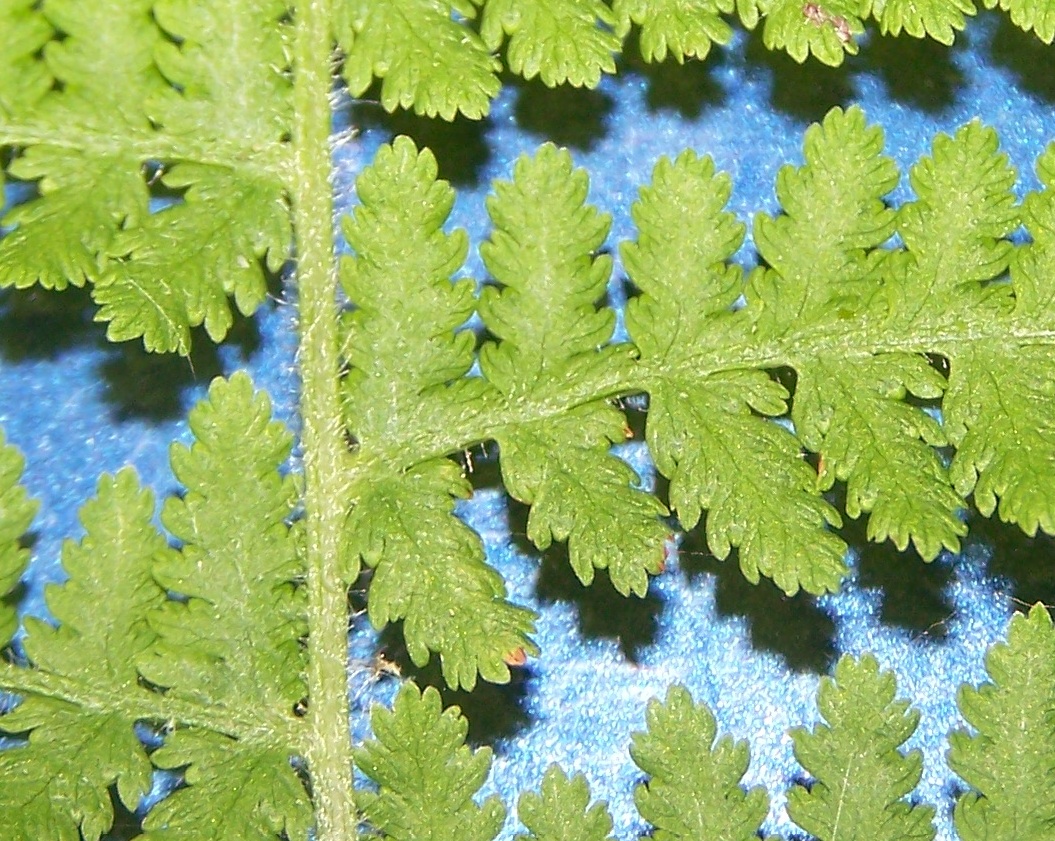
    Next, I look at the individual leaves and the pattern in which they grow from the stem. This photo shows that they alternate off the main stem. One grows on the left side then a little higher on the stalk one grows from the right side.  For many plants, that’s an important clue. We also notice that other than these complex leaves, there are absolutely no side branches.
    Leaf detail of creeeping fragile ferm (Cystopteris protrusa)
    Photo by Brad Sylvester, copyright 2011, all rights reserved
    These are complicated leaves. They almost resemble fractal patterns in their complexity. Eventually, when we narrow it down to some likely candidates, we should be able to match this pattern up for an exact match. We also note that although the overall shape of the frond is like a triangle, widest at the base and narrowing as it goes toward the tip, the lowermost 2-3 pairs of leaves are a bit shorter than those nearer the center of the plant breaking the true triangular shape.
    Meanwhile, from my experience in growing up as a curious young boy in the woods of New England, I know that many ferns have distinctive spore structures on the underside of each leaf. Flipping this one over, I see that it does. These little white dots will each release spores that will fall to the forest floor or drift on the wind, or the back of some furry animal, until it reaches a suitable place to grow. True ferns do not have seeds at all, they reproduce with spores. The shape, arrangement, color and size of these will also help us identify this fern.

    Sori of the creeping fragile fern (Cystopteris protrusa)
    Photo by Brad Sylvester, copyright 2011, all rights reserved

    Individual stems lead from the soil, not clustered stems
    Photo by Brad Sylvester, copyright 2011, all rights reserved
    What else can we see? At the base of each plant, a single stem emerges from the ground. These ferns don’t grow in clusters with many stems coming from a single base. Honestly, though, I don’t know what a fern’s root system looks like. Is there a bulb down there that stores energy through the winter? Are the roots like any normal plant? Let’s have a look. Carefully digging with my fingers so that I can feel the roots as I go and not damage them beyond all recognition, I find a surprise. The stem of the fern forms a perpendicular attachment to a horizontally running root.  Ah-ha! Although the fern is capable of reproducing through the dispersal of spores, it seems that might just be a back-up plan. Carefully following the “runner” or thick horizontal root, I come to another stem and another fern. Although they look like separate plants from above ground, they are, in fact, parts of the same larger plant.
    Rhizome of Cystopteris protrusa showing next year's buds
    Photo by Brad Sylvester, copyright 2011, all rights reserved
    The other end of this runner heads out toward the lawn. Let’s see what happens there. Ah-ha again! We see a number of tiny branches, also in an alternating pattern, each with a little green bud-like formation at its tip. These are new ferns waiting to break through the surface.  If I didn’t mow the edge here would the ferns keep marching out into the lawn? Would they grow even in the sunlight? Probably not in the full sun, but they’d push the edge and might do ok in the spring and fall when the sun is at a lower angle and the shady area is extended further out into the yard. The root system might extend itself this way for a considerable distance under the lawn, just hoping that one of those underground branches will break through the surface in an area where it can thrive.
    Communal Ferns
    Which brings up another interesting question: is this whole patch of ferns actually just one plant? Does it grow almost as a colony originating from one single interconnected root system? I might, in fact, only have one fern in my yard, although it covers several hundred square feet. If they are all a signal plant, that also tells us something about its vulnerability to environmental toxins. In theory, an application of a powerful systemic herbicide in one part of the yard might be transported through the runner system to kill an entire patch of ferns where only one or two ferns were actually sprayed.
    Similarly, a fungus or bacterial infection might also spread through this underground piping network to take out a whole patch of ferns fairly quickly. If we saw that happening, we might use a shovel to sever the underground runners between healthy areas of the fern patch and unhealthy areas. Then physically dig out and remove the bad part of the colony and hope that whatever it was hadn’t yet reached the rest of the root system.
    If we were chemically treating a fungus infection we’d want to make sure that we spray the entire patch rather than just the visibly affected area to prevent it from traveling through the runners to an untreated area. Mind you, this is just conjecture on my part, and would need to be tested experimentally for confirmation.
    Fern Propagation
    By the way, if we wanted to propagate this very attractive fern as a landscape border or a shady ground cover, we’d dig up and cut a section of the root and bury it in the area where we wanted it to grow. I’m not sure whether we’d need an end piece with the tiny ferns ready-formed or whether any section of the root would be viable. Again, that’s an experiment waiting to happen. I expect that the end piece with the buds would work best and produce new ferns faster and more prolifically, but any significantly sized section of the root would also survive and begin forming buds as well. Just guessing, though.
    Anyway, sorry to get distracted, but that’s part of the reason why I’m conducting this bio-survey, to discover things I didn’t know about the things that live and grow right in my own backyard. So for identification purposes we know:
    1)      It produces spores from the underside of the leaves and we have images of the sori (a cluster of spore-producing structures).
    2)      It has a single stem with alternating leaves growing from it.
    3)      We have an image of the exact shape of the leaf.
    4)      We know that it reproduces through rhizomes or underground roots and we know what those roots look like.
    5)      We know what kind of habitat it likes.
    6)      We know what part of the country it lives in.
    Is that enough to identify it positively? I think so. First, I’m going to assume that I know it’s a true fern. So let’s start climbing the taxonomy tree. Searching the Internet, I find the University of Michigan’s Sustainable Urban Landscaping Information Series (SULIS) Ferns page. I’m not doing urban landscaping, but it stands to reason that sustainable landscaping would use native plants that grow naturally in the region and habitat which is to be landscaped.
    From the information provided on the SULIS page, I’m going to rule out three of the four classes of ferns. What I have is not Psilotopsida of which the only surviving species is the whisk fern. It is not Lycopodiopsida which is comprised of spikemosses, clubmosses and quillworts. It is definitely not Equistopsida which as you might guess contains only horsetails.
    That leaves Polypodiopsida (Pteropsida for you Latin-philes). These are the true ferns with 9 sub-classes, 25-300 genera (the plural of genus), and over 12,000 species. Sigh. By the way, SULIS has a page with information about fern propagation which confirms some of my rhizome cutting conjecture, and also reminds me that fern leaves are called fronds, and the spore cases on the underside are called sori.
    Let’s get back to our taxonomy. Pteropsida is the class of true ferns within the phylum Pterophyta. I spent some time, unsuccessfully looking for an identification guide online. I’ll need to pick up a good fern field guide. Meanwhile, using Wikipedia, as much as it isn’t a primary research source, I find seven sub-classes: Osmundales, Hymenophyllales, Gleicheniales, Schizaeales, Salviniales, Cyatheales, and Polypodiales. Now I can search each of those and look for enough description to either include or exclude the fern I found in my yard from each subclass.
    Wikipedia says 80% of today’s ferns fall into Polypodiales, so let’s start there. Searching again, I find the University of Wisconsin’s  Robert W. Freckman Herbarium page on fern identification, which drills down a bit lower than Polypodiales. Out next choice is between Families. I think my fern is a member of the Dryopteridaceae family, but it’s clear that to go any further, I’m going to need a vocabulary lesson to figure out what terms like rupestral, scandent, dictyostelic, glabrous, pinnatifid, acrostichoid, and too many others to list all really mean. The photos on the site are not sufficient for clear cut identification.
    So let’s call it day and come back to this one another time.
    Fern Identification Day 2
    I came back to the problem of identifying this fern a day later with a fresh idea for searching for online identification guides and it bore fruit immediately -- quite unlike ferns themselves… I finally found a fern identification key at the University of Wisconsin – Green Bay.  It’s on the Herbarium page of the Cofrin Center for Biodiversity. As it asks about specific characteristics being present or not, it includes links on the key terms describing what each is and showing photographic examples. Exactly what I need. A virtual Fern Identification for Dummies. Consequently, it also helps me to learn the terms by using the built-in glossary. This will be my primary resource for fern identification.
    At Last! Creeping Fragile Fern
    By drilling down through their binary identification system I believe the fern I photographed to be of the genus Cystopteris. One species of that genus, Cystopteris protrusa commonly named the creeping fragile fern, seems to be the most likely candidate as it has some keys distinctions from other Cystopteris species.
    1) The creeping fragile fern prefers to grown on soil rather than rocks.
    2) It is the only species of the Genus in which the rhizome extends out past the last frond and contains buds for the following year’s fronds.
    3) Its range includes New England and it is quite common.
    It is the second characteristic which, to me nails the identity as Cystopteris protrusa. You’ll remember that I remarked about the rhizome extension and underground buds. This turned out to be a good exercise, a strong learning experience, and it really highlights the need for thoroughness in the field. I literally had to dig a little deeper to find the characteristic that led me to a good identification on this species.  Genuine curiosity is your best tool for exploration.
    At present, I am not abotanist. I've had zero training. I am however, very curious, and quite persistent. In a year from now, I'll be pretty darn good at idenitfying plants by site in the field. If you faollow along with me on this blog and put what you lean into practice, you just might be too.
    Cystopteris protrusa Propagation Revisited
    By the way, based on the fact that we know the buds represent the following year’s ferns, I expect that to propagate the creeping fragile fern, this terminal portion of the rhizome would need to be transplanted. This may, or may not, hold true for other species of the genus.

    Monday, July 18, 2011

    Wintergreen (gaultheria procumbens)

    Wintergreen or eastern teaberry (Gaultheria procumbens)
    Photo by Brad Sylvester, copyright 2010, all rights reserved
    I'm going to start off the list of plants that grow in my yard with one that was a very pleasant surprise when I moved here. Wintergreen (Gaultheria procumbens), sometimes called Eastern Teaberry, is one of the edible native plants that lives in the woods in my yard. It is very plentiful, growing in the shade of the forest canopy. Wintergreen is both edible and potentially deadly poisonous, so please read the information contained in the linked article. It happens to be one of the few plants about which I've already written for Examiner.com so I'm going to refer you to the link below for what I wrote there which includes medicinal properties and poison warnings.
    Additionally, I will tell you that this spring, 2011, seemed to be a very good year for new wintergreen plants. The reddish young leaves of new plants seemed to be springing up everywhere.

    To date, I haven't found any evidence of the plant being eaten by anything (other than myself). It seems to be pretty well left alone by insects and other herbivores. It grows in normal to moist soil conditions in the shade or very dappled sunlight. It gets it's name, as you might guess, because it stays green and keeps its leaves all year, through even the coldest of New England winters. Given the low light environment in which it lives, it must find it more economical of energy and nutrients to preserve its leaves through winter than to try to grow new ones every spring. Keeping the leaves through winter, of course, also gives wintergreen an advantage in the spring time, it can take advantage of the bare canopies overhead while the sun's indirect rays are still relatively weak in the early part of the year.

    I recall that in grade school many years ago in southern Vermont, when we learned how to make little terrariums, wintergreen was one of the plants we sought. It needs little light, can live in humid and moist environment, was very slow growing, and of course, doesn't drop its leaves and look dead in the winter. As a bonus, depending upon the plant you found, it might also have a bright red berry to give the terrarium a little bit of color.

    Quick Facts about Wintergreen (Gaultheria procumbens)

    Edible: Yes, in small quantities. Can be fermented to make a tea.
    Life cycle: Perennial, evergreen
    Propagation: Spreading underground rhizomes, less often by seeds contained in berry
    Other uses: Essential oil, medicinal uses (See linked article above for details)
    Range: Eastern North America from the Gulf of Mexico and north through out eastern Canada (from the USDA website)
    Native or introduced: Native, undomesticated
    Poisonous: Yes, in quantity. Wintergreen essential oil has been known to cause fatalities through both ingestion and excessive topical use.

    Introduction

    Hello and welcome to "What Grows in my Yard?" I recently began a project to to identify every living animal that lives in my yard and have decided to expand that to cover every living plant as well. Well, technically, more than just plants as, I guess, fungus is in its own category now and doesn't fall into the plant kingdom.

    Anyway, the yard consists of 5.25 acres in Southern New Hampshire, about 30 miles from the Seacoast and at about 800 feet in elevation on average (some higher, some lower). About 1 acre is consumed by the house, driveway, lawn and vegetable gardens. the rest is forested. It's generally a mixed deciduous/ coniferous forest, but there are a couple of areas with very small pine barrens (perhaps 100 feet by 100 feet where very little other than pine trees grow and the forest floor is covered inches deep in pine needles. There are also two seasonal streams that tend to run dry around mid-July each year, and a small area that stays muddy and wet all year round.

    From a plant habitat point of view, it's quite varied. When you add in all the domestic plants that we've added to the landscaping around the house, there's a huge number of different plant and fungus species here.

    Let me be clear right up front. I am not a botanist or a plant expert, by any means. I've spent decades in and around the forests of New England and know at least common names for a fair variety of plants, but for most I'll be doing research to try to identify the plants that I find, much like the way I do for animals on my What Lives in My Yard Blog.


    On that blog, I expect to identify around 1000 species of animals that live in my yard. If I had to guess how many plant and fungus species grow in my yard, I'd guess about the same number.

    I'll be breaking the entries into two categories, native and introduced. Introduced will be used for anything that I have manually added to the yard. An apple tree, pole beans, daffodils, chives, and so forth whether they are native to the region or not.

    I'll also detail which plants are edible, poisonous, or have other uses, relying on both my own experience and the research I'll do for each one. I'll relate any interesting information about the plant (like how to make birch beer and maple syrup), its formal taxonomic classification, and I'll note any insects or animals that appear to be feeding on it or using it as a home. I'll also note and apparent symbiots or parasites (fungus growing on a tree trunk, for example). For domestic or introduced plants, I'll also include a little about the care and propagation of the plant.
    Sooner or later, I'll cover every plant and fungus that's growing in my yard. That'll include all of my perennial flowers and herbs, annual vegetables and flowers, mushrooms, trees, grasses, berries bushes, mosses and everything else.

    Additionally, since I use a greenhouse, hydroponics, and various other methods and equipment to grow and propagate plants, I'll offer my experience with these as well. 

    If any or all of that sounds interesting, I urge you to use one of the follow this blog functions found in the side panels to subscribe.